BG-Map TechNote
How
to Set Options for BG-Map Visitors QUICKFinder
BG-Map
Updated
2/24/12
This
document explains how to set the various options that control the operation of
BG-Map Visitors QUICKFinder.
|General Options| |Printing| |Topics and Special Collections| |Tours and Reports|
|Special
Characteristics/Nurseries| |Home Page Images/Color Schemes| |Visitor Feedback|
|E-Mail|
VQF Options
Options
Set Separately for Each BG-Map User
A different set of options is saved for each user name. You can customize the
behavior of multiple VQF kiosks by creating a different BG-Map user name for
each kiosk.
Setting Options for Another User
To change the VQF options for a different user, click the Browse Button ![]() labeled "User."
labeled "User."
More About VQF Options
·
For more on how to set up
a VQF kiosk, see How to Customize Visitors QUICKFinder
Accessing the VQF
Options Window
Click Utilities/VQF Setup/VQF Options.
Use Common Name In Title
Block
Select "Yes" to display in the VQF snapshot map title block the
common name of the plant (if available). If no common name is available, the
scientific name will be used instead. Select "No" to always display
the scientific name.
Show Site Grid
Click "Yes" to display the site map grid on the VQF snapshot map.
(The site map grid shows the quadrant designations and coordinates along the
edges of the site map.) Click "No" to disable display of the site map
grid.
Allow Find Any Plant By Name
Click "Yes” to allow the visitor to search for any plant by name
(excluding plants in excluded regions and plants marked as "location
sensitive" in BG-BASE). Click
"No" to allow the visitor to select only plants that have been
included in "Special Collections" (which you can define).
Size Units
Select the units to be displayed for the current and/or ultimate size - English
or Metric.
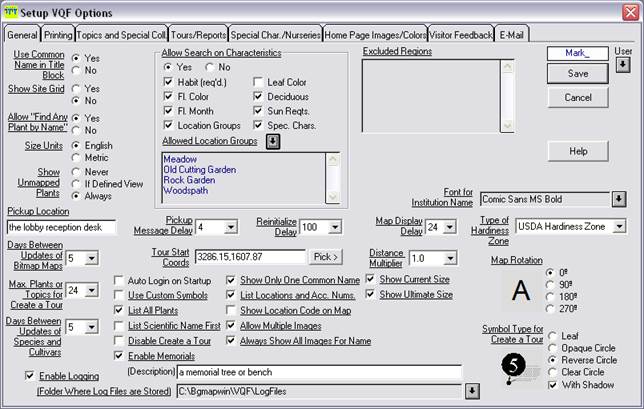
Show Unmapped Plants
This setting determines whether or not unmapped plants are displayed by VQF.
The options are:
·
Never - Unmapped plants are
never displayed.
·
If Defined View - Unmapped plants will be
displayed only if there are no mapped plants of the same taxon. In order to
show an unmapped plant, you must create a Defined View showing the outline of
its BG-BASE Location (see
"Defined Views for Locations for VQF") Note - unmapped plants cannot
be selected for "Create a Tour".
·
Always - Unmapped plants will be
displayed if there are no mapped plants of the same taxon whether or not there
is a corresponding Defined View showing the outline of the BG-BASE location. If there is no corresponding Defined View, plant
information is displayed with a note "No map is available".
For more on displaying unmapped plants, see How to Display Unmapped
Plants in Visitors QUICKFinder
(https://www.bg-map.com/userdata/VQF_Unmapped_Setup.html)
Allow Search on Characteristics
Click yes to allow the visitor to search for plants by characteristics. Check
the individual characteristics to allow searching on - flower color, flower
month, etc.
·
Searching on habit is
enabled by default. Searching on leaf color is not available with DOS BG-BASE.
·
Only the Special
Characteristics that you enter on the Special Characteristics tab will be
searchable.
·
The "Location
Groups" option allows visitors to search for plants within a specified
BG-BASE location group. If you check this option, you also need to specify
which location groups are allowed for searching. Click the browse button, and
select one or more location groups. This option is not available with DOS
BG-BASE.
Excluded Regions
This box lists the regions that you have designated as being excluded from
plant searching by visitors. To define an excluded region, go to the Setup Menu
and create a region bounded defined view whose name begins with the prefix:
EXR_ (Note the underscore.) You can create more than one excluded region.
Font For Institution Name
You can select a font to be used for display of the user institution's name on
the VQF home page and the VQF search by name page. The same typeface will also
be used on the title lines of the other VQF pages. If you do not select a font,
the default font will be used.
The selected font size will affect the size of the name text on the VQF home
page and the VQF search by name page only. The font size on the other pages is
fixed. Only the typeface can be changed.
Pickup Location
Use this line to specify a location where the visitor is to pick up his or her
map, for example "the reception desk". This line may be left blank,
if desired.
Pickup Message Delay
This setting specifies the number of seconds that a message is displayed when a
visitor initiates printing of a map. The delay can be set from 2 to 20 seconds.
The default setting is 4 seconds.
Reinitialize Delay
This setting determines how many seconds of inactivity are permitted before
Visitors QUICKFinder reinitializes and returns to the home screen. Select a
value between 20 and 200 seconds.
Map Display Delay
This setting is applicable only if you are using AutoCAD LT. It sets the number
of seconds (1-36) to delay the display of an on-screen plant location map. This
is the map that is displayed when the visitor presses the "View Map"
button. Set this to the lowest value that will allow the map to be reliably
displayed. The faster your computer, the lower this setting can be.
Type Of Hardiness Zone
Select the type of hardiness zone information to display for the visitor. The
choices are USDA, EGF, RHS,
Tour Start Coords
Enter the coordinates of the tour start point (The location of the kiosk where
you are running Visitors QUICKFinder). BG-Map uses these coordinates to
calculate the distances to selected plants and the optimum tour sequence. Enter
the coordinates in the standard AutoCAD x,y format -
example 3423,2156. Or, click "Pick >" and click a point on the
map.
Distance Multiplier
Select a multiplier between 1.0 and 1.9 to be used for calculation of estimated
walking distance to selected plants. The multiplier compensates the estimated
distance to reflect the difference between the straight line distance and
actual walking distance.
Days Between Updates Of Bitmap Maps
Select the number of days from 0 to 60 to retain bitmap maps that show the
location of the plant when the visitor clicks "View Map". After the
expiration of this time, the bitmap is rebuilt the next time a visitor requests
to view the map - this process takes several seconds.
If a 0 is entered, bitmap maps are not generated, and the default sitemap
c:\bgmapwin\bitmaps\site.bmp is used instead.
Bitmap maps are stored in the folder c:\bgmapwin\vqf\map_bmps. To force all
bitmap maps to be rebuilt, delete all files in this folder.
Maximum Plants or Topics for Create a Tour
Sets the maximum number of plants or Topics the visitor can select - from 6 to
24.
Days Between Updates Of Species/Cultivars
Select the number of days (0 to 60) between updates of species and cultivar
selection lists. To force BG-Map to always rebuild the lists, select 0. (After
BG-Map builds a selection list of species or cultivars for a genus, it saves
the list for the number of days that you specify. When this time expires, the
list is rebuilt.
Enable Logging
If this box is checked, a log file will be generated, showing activity on VQF.
For details, see Log Definitions.txt in the VQF folder.
You can set the folder where log files are stored by clicking the browse
button. The default folder is C:\Bgmapwin\VQF\LogFiles. You can generate Log
File Reports. For details, go to Utilities/VQF Setup/Feedback and LogFile Reports and click Help.
Auto Login on Startup
If you check this box, BG-Map will log in automatically on startup, without the
need to enter a user name or password. This will only work if the current user
name begins with the word "Kiosk." This feature can be used to automaticall restart the kiosk in the event of a power
failure and system restart.
Use Custom Symbols
If this box is checked, custom symbols will be displayed in place of the
standard canopy symbols. See "Custom Symbols" in the Setup Menu for
details.
List All Plants
If this box is checked, all plants of a particular taxon will be listed, except
for multiple plants in a single accession in the same quadrant. If not checked,
some plants will not be listed if they are newer or farther away than plants
that are already listed, or if they are not mapped and mapped plants are
already listed.
List Scientific Name First
If this box is checked, the scientific name of each plant will be listed first
on maps.
Disable Create A Tour
If this box is checked, the "Create a Tour" feature will be disabled.
Note, "Create a Tour" will also be disabled if you set "Allow
Map Printing" to No.
Enable Memorials
Check this box to allow the visitor to search for memorial trees or plants or
other memorials such as benches or artwork. In the space labeled “Description”,
enter words describing the types of memorials that may be found. For example,
if you enter the words “a Memorial Tree or Bench”, the VQF screen will display
“Locate a Memorial Tree or Bench”.
To designate a tree or plant as a memorial plant, choose "Designate a
Memorial Plant" in the Map Menu. To designate a memorial bench, plaque,
etc., click the "Topics and Special Collections" tab of this window,
and select "Edit Topics".
For more, see How to Display Memorial
Trees, Benches and Other Memorials in BG-Map Visitors QUICKFinder (https://www.bg-map.com/userdata/VQF_Mem_Setup.html)
Show Only One Common Name
If this box is checked, only the first common name of each plant will be listed
on maps.
List Locations and Acc. Nums.
If this box is checked, Location codes and accession numbers will be included
in popup selection lists of plants.
Show Location Code on Map
If this box is checked, the location code will be printed in the map title
block.
Allow Multiple Images
If this box is checked, the visitor can choose from all images assigned to a
Plant or to its Accession or Name. If it is not checked, the visitor may only
view a single image, which has been assigned for display by VQF - See the Setup
Menu/Plant Images.
Always Show All Images For Name
If this box is checked, VQF will always display all images assigned to a name
regardless of whether there are images assigned specifically to a plant
Show Current Size
If this box is checked, the last measured size of a plant will be displayed
(along with the year), if available.
Show Ultimate Size
If this box is checked, the ultimate size of a plant will be displayed (from
the NAMES file), if available.
Map Rotation
Set the direction you wish the map to be rotated for VQF printouts and
on-screen display. Zero degrees corresponds to no rotation. The angles
represent counterclockwise rotation from zero degrees. This setting may be used
to make the map correspond to the orientation of your visitor maps. If you
choose a rotation other than zero, it is a good idea to create a separate
version of your basemap with the main text labels rotated to match.
Symbol Type for Create a Tour
You can select from 4 symbol types to designate plant locations. Check
"With Shadows" to display a "shadow" for each symbol
(similar to Google Maps)
·
Leaf - Each plant location is
marked by a leaf with a number inside. This is the most decorative of the
symbols, but also the one that takes up the most space on the map.
·
Opaque Circle - Each plant location is
marked by an opaque circle with a number inside.
·
Reverse Circle - Each plant location is
marked by an black opaque circle with a white number inside.
·
Clear Circle (default) - Each plant
location is marked by a clear circle with a number inside. This is the best
symbol to use if the plants are close together.
Settings on the
“Printing” Tab
Allow Plant Map Printing
If
"Yes" is selected, a visitor may print plant maps. If "No"
is selected, a visitor may not print plant location and Create a Tour maps.
Note: This setting does not affect the printing of maps for Topics. See the
Topics and Special Collections tab for details on how to control that function.
Allow Image Printing
Click "Yes" to allow visitors to print plant images. Click
"No" to disable this feature.
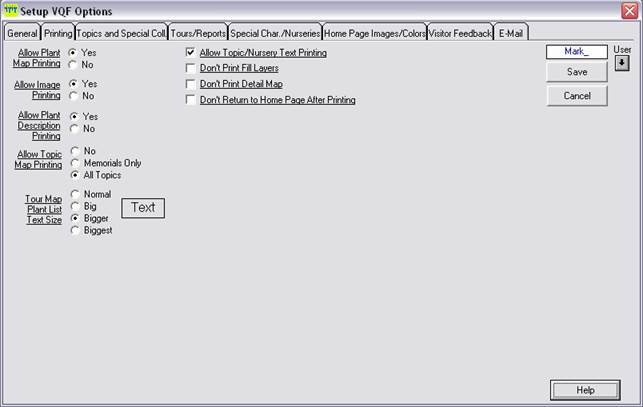
Allow Plant Description Printing
Click "Yes" to allow visitors to print plant the information in
the plant description box, if available. Click "No" to disable this
feature.
Allow Topic Map Printing
Select "No" to prevent visitors from printing maps showing the
locations of Topics. Select "Memorials Only" to allow visitors to
print maps for Topics designated as memorials but not for other Topics. Select
"All Topics" to allow printing of maps for all Topics.
Tour Map Plant List Text Size
This controls the size of the text on the printed or e-mailed plant lists
that accompany plant tour maps.
Allow Topic/Nursery Text Printing
If you check this box, visitors are able to print the text displayed for a
Topic or a Nursery.
Don't Print Fill Layers
If this box is checked, layers containing solid filled areas will be turned
off when printing maps. These layers must have names that end in the word FILL
- WATER_FILL for example.
Don't Print Detail Map
If this box is checked, the closeup detail map (page
2) will not be printed. Only the overal location map
(page 1) will be printed.
Don't Return to Home Page After Printing
If this box is checked, VQF will not automatically return to the home page
after printing a map or plant description.
Settings
on the “Topics and Special Collections” Tab
Topics Table
This
table lists the topics that are to be displayed on the VQF home page. To edit or create new topics, click the “Edit
Topics” button. For more information, see How to Create and Edit
Topics, below.
Note: Even if created, a Topic
will not appear in VQF unless you add it to this table. To do so, click on an empty cell in the first
column (labeled “code”), and then right-click to select the Topics to be
included. (To create an empty row, press
the “Insert” key on the keyboard.)
Select “Browse”, and select one or more topics. To delete a topic from the table, click on
the code, and then right-click and select “Delete” (or press the “Delete”
key). To open one of the listed topics
for editing, click on the code, and then right-click and select “Open
Record”.
Selecting the Topics
To select the topics to be included, click on an empty cell in the first column
(labeled “code”), and then right-click. Select “Browse”, and select one or more
topics. To delete a topic, click on the code, and then right-click and select
“Delete” (or press the “Delete” key).
Editing a Topic
To open one of the listed topics for editing, click on the code, and then
right-click and select “Open Record”.
Reordering the Topics
The change the display order of the Topics, click on a Topic in the table and
then click the up or down arrows to move it in the table.
Allowing a Topic to be Included in Tours
Topics can be included in visitor-selected or canned tours only if the
"Allow Inclusion In Tours" attribute is checked in the Topic record.
For details, click "Edit Topics" and then click Help.
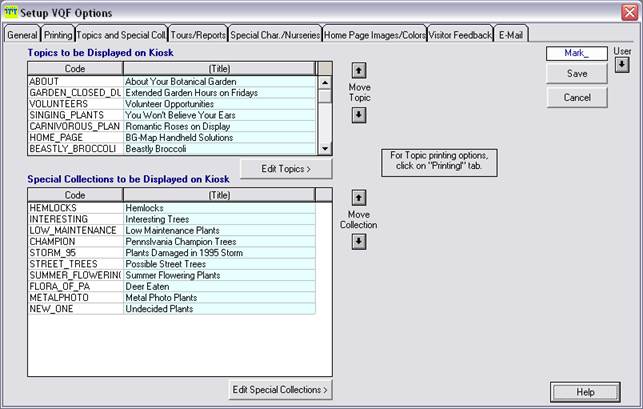
Special Collections Table
This
table lists the “Special Collections” from which the visitor may select
plants. To edit or create new Special
Collections, click the “Edit Special Collections” button. For more information,
How to Create and Edit Special Collections, below.
Even if created, a Special Collection will not appear in VQF
unless you add it to this table. To do
so, click on an empty cell in the first column labeled “code”. (To create an
empty row, press the “Insert” key on the keyboard.) Then right-click, and click “Browse”, and
select one or more Special Collections.
To delete a Special Collection from the list, click on the code, and
then right-click and select “Delete” (or press the “Delete” key on the keyboard). To open one of the listed Special Collections
for editing, click on the code, and then right-click and select “Open Record”.
Selecting the Special Collections
To select the Special Collections to be listed, click on an empty cell in the
first column (labeled “code”), and then right-click. Select “Browse”, and
select one or more Special Collections. To delete a Special Collection from the
list, click on the code, and then right-click and select “Delete” (or press the
“Delete” key.)
Editing a Special Collection
To open one of the listed Special Collections for editing, click on the code,
and then right-click and select “Open Record”.
Reordering the Special Collections
The change the display order of the Special Collections, click on a Collection
in the table and then click the up or down arrows to move it in the table.
Allowing a Special Collection to be Used as a Canned Tour
To allow a Special Collection to be used as a Canned Tour, it must be listed in
the table that appears under the "Tours/Reports" tab. For details,
click the "Tours/Reports" tab and then click Help.
Settings on the “Tours/Reports” Tab
About Canned
You can select one or more Special Collections to be used as "Canned
Tours" in VQF. A Canned Tour works the same as a "Create a Tour"
plant tour, except the plants are pre-selected. The visitor may add plants to
or delete plants from a Canned Tour.
To create or edit Special Collections, click the "Edit Special
Collections" button. Only the number of plants permitted by "Maximum
Plants for Create a Tour" setting (on the "General" tab) will be
used. For example, if the maximum plants is set to 12, and a Special Collection
includes 20 plants, only the first 12 of these will be used for the Canned
Tour.
Any Special Collection can be used as a Canned Tour, as a Special Collection
for selecting plants or for both purposes.
Designating Canned Tours
To select Special Collections to be listed as Canned Tours, click on an empty
cell in the first column (labeled “code”), and then right-click. Select
“Browse”, and select one or more Special Collections. To delete a Special
Collection from the list, click on the code, and then right-click and select
“Delete” (or press the “Delete” key). To open one of the listed Special
Collections for editing, click on the code, and then right-click and select
“Open Record”.
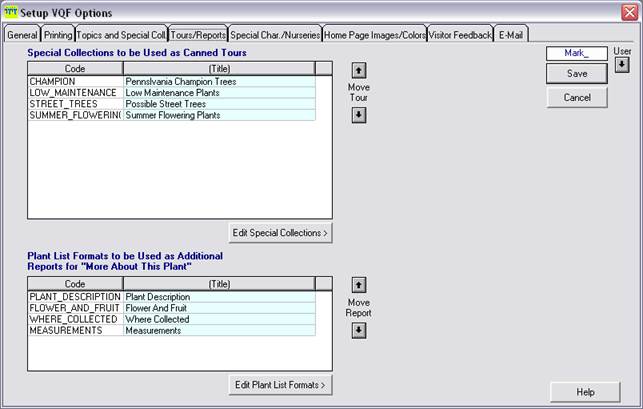
Reordering The Canned
The change the display order of the Canned Tours, click on an entry in the table
and then click the up or down arrows to move it in the table.
About Additional Reports
You can allow the visitor to generate additional reports about a plant using
selected Plant List Formats. These are created when the visitors touches the
"More About This Plant" button.
Designating Plant List Formats That Can Be Used To Create Additional Reports
To select Plant List Formats that may be used to create Additional Reports,
click on an empty cell in the first column (labeled “code”), and then right-click.
Select “Browse”, and select one or more Plant List Formats. To delete a Plant
List Format from the list, click on the code, and then right-click and select
“Delete” (or press the “Delete” key).
Reordering The Plant List Formats
The change the display order of the Plant List Formats, click on an entry in
the table and then click the up or down arrows to move it in the table.
Settings on the “Special Characteristics/Nurseries” Tab
Display Special Characteristics
If
you check this box, Special Characteristics (SPEC_CHARS) from the NAMES file
will be displayed by VQF. To display
Special Characteristics, check the box.
Then click on an empty cell in the first column of the table, right
click, select "Browse", and select as many Special Characteristics as
you wish. (To create an empty row, press the “Insert” key on the
keyboard.) Only the selected Special
Characteristics will be displayed by VQF.
The others will be ignored. To
delete a Special Characteristic from the list, click on the code, and then right-click
and select “Delete” (or press the “Delete” key on the keyboard).
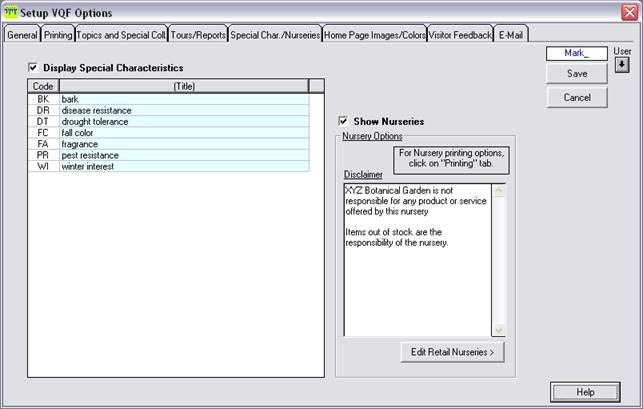
Show Nurseries
If
you check this box, visitors can display a list of nurseries carrying the
plants they are interested in. You must
enter the nursery information by clicking “Edit Retail Nurseries.”
Disclaimer (optional)
Use
this box to enter any disclaimer you wish to display regarding your
institution's non-responsibility for products or services offered by listed
nurseries.
Settings on the “Home Page Images/Colors” Tab
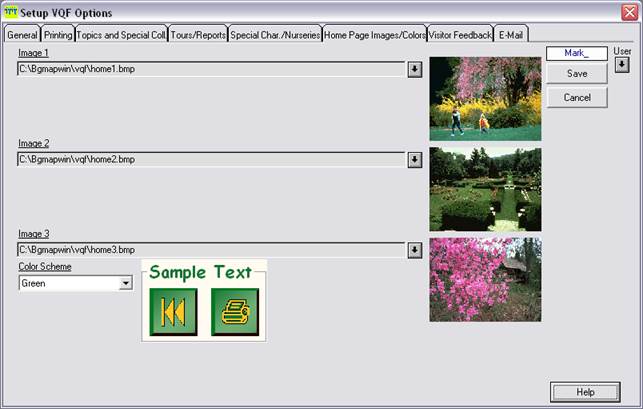
Click the browse buttons to select the 3 images to be displayed on
the VQF home page. Select either BMP or
JPG images, not GIF images. Horizontal
images of any size may be used, but smaller images, 800 pixels or less wide,
will load faster than very large images.
Click the browse button to select the color scheme: Blue
(default), green, Red Clay, or Turquoise. The adjacent rectangle will show a
preview of the selected color scheme and font.
Settings on the Visitor Feedback Tab
This tab allows you to set options for collection of data from
visitors that can be used to add them to a mailing list, membership, etc.
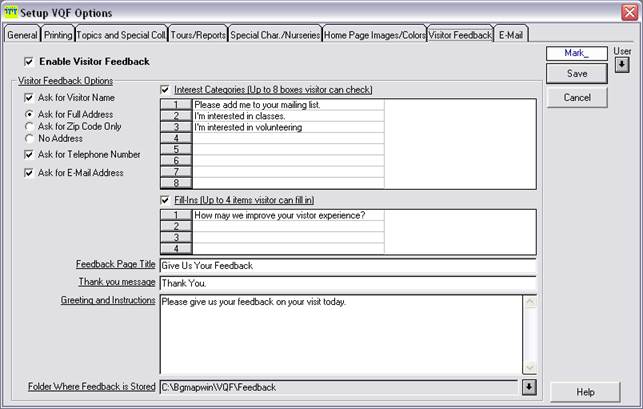
About Feedback
The
feedback option allows you to gather information from visitors for purposes
such as mailing lists or class registration and as a way to gauge visitor
satisfaction. This tab allows you to set options for collection of data from
visitors that can be used to add them to a mailing list, membership, etc.
Enabling Feedback
To enable Visitor Feedback, check the box so labeled, and check the boxes
corresponding to the information you wish to collect - name address, etc.
Interest Categories
These are the check boxes - as many as 8 - that will appear on the feedback
form. The visitor may check as many as are applicable. On each line of the
table, enter the text that you wish to appear next to the corresponding check
box - "Please put me on your mailing list", "I'm interested in
membership", etc. Use only as many lines as you need.
Fill-Ins
These are spaces on the form - as many as 4 - in which the visitor may
enter comments or other textual information. On each line of the table, enter
the label that you wish to appear for each fill-in box - "Please Enter
Your Comments", "How can we improve your visitor experience",
etc. Use only as many lines as you need.
Feedback Page Title
Enter the title that you wish to appear on the feedback page. This title will
also appear next to the button that accesses the feedback page.
Feedback Page Greeting and
Instructions
Enter the greeting and instructions that you wish to appear on the feedback
page.
Thank You Message
Enter the message that you wish to be displayed after the visitor submits
her feedback.
How and Where Feedback Is Stored
You can set the folder where feedback is stored by clicking the browse
button. The default folder is C:\Bgmapwin\VQF\Feedback.
Feedback is recorded in a comma-separated values (CSV) file located in the
specified folder. A separate file is created for each day, and the filename
includes the date.
CSV files can be opened by programs such as Microsoft Excel and Access, and
similar
applications. Or you can generate Feedback Reports. For details, go to
Utilities/VQF Setup/Feedback and LogFile Reports and
click Help.
Interest Categories
These
are check boxes - as many as 8 - that will appear on the feedback form. The visitor may check as many as are
applicable. On each line of the table,
enter the text that you wish to appear next to the corresponding check box -
"Please put me on your mailing list", "I'm interested in
membership", etc. Use only as many lines as you need.
Fill-Ins
These
are spaces on the form - as many as 4 - in which the visitor may enter comments
or other textual information. On each
line of the table, enter the label that you wish to appear for each fill-in box
- "Please Enter Your Comments", "How can we improve your visitor
experience", etc. Use only as many
lines as you need.
Feedback Page Title
Enter
the title that you wish to appear on the feedback page. This title will also appear next to the
button that accesses the feedback page.
Feedback Page Greeting and Instructions
Enter
the greeting and instructions that you wish to appear on the feedback page.
Thank You Message
Enter
the message that you wish to be displayed after the visitor submits her
feedback.
How The Feedback Is Recorded
The
feedback is recorded in a comma-separated values (CSV) file located in the
C:\BGMAPWIN\VQF\FEEDBACK folder. A
separate file is created each day, and the filename includes the date. CSV
files can be opened by programs such as Microsoft Excel and Access, and similar
applications.
Generating a Feedback Report
You can generate a report that gathers the
information collected by the feedback function.
It lists all feedback over a specified date range. To create a report, select Utilities/VQF
Setup/Feedback and Logfile Reports.
Settings on the E-Mail Tab
This tab allows you to
enable and set up the VQF e-mail feature that allows visitors to e-mail home
text, maps, and images.
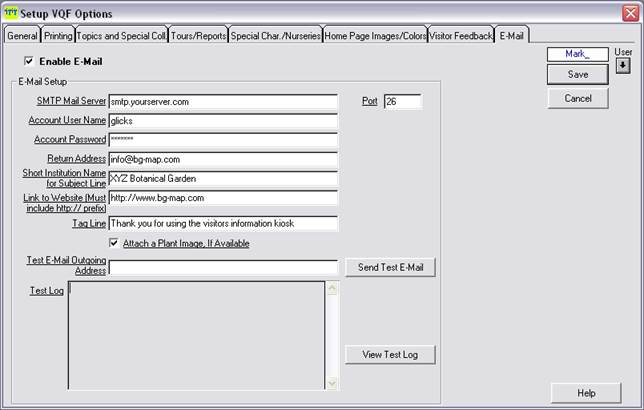
Note: To use the e-mail
feature, the kiosk must be connected to the internet, and you must have an
outgoing e-mail SMTP account with an internet service provider.
Enable
E-Mail
To enable E-Mail, check the box so labeled.
Entering
E-Mail Setup Information
Mail Server
Enter the name of the outgoing mail server in the same manner as you would when
setting up an e-mail program such as Microsoft Outlook or Eudora.
Account User Name
Enter the user name for the e-mail account.
Account Password
Enter the password for this e-mail
account. (If a password is not required,
leave this blank.)
Return Address
Enter the return address to be inserted into the outgoing e-mail messages. This must be an actual working e-mail
address.
Short Institution Name for
Subject Line
Enter the institution name you wish to appear
on the subject line of outgoing e-mails.
If your institution has a long name, it is better to use a shortened
version, because of limited space on the subject line. For example, if your institution name is
"The Royal Botanical Garden of the Principality of Humberland",
you might shorten it to "RBG Humberland",
in which case the subject line of a typical e-mail would read: "Plant
Information from RBG Humberland".
If you leave this field
blank, the full institution name will be used
Link to Website (optional)
Enter the address (URL) of your institution's
website. The URL must include the
https:// prefix. This will be linked to
the institution name and logo at the top of the e-mail message.
Tag Line (optional)
Enter a line of text that you wish to appear
at the top of the e-mail message.
Example: Thank you for using the
visitors' kiosk.
Attach Plant Image If
Available
If you check this box, a plant image will be
attached to the e-mail. If you designate
an image as "Use this image for Visitors QUICKFinder" in Image Setup,
that image will be sent. Otherwise, the
first image found will be sent.
Sending a Test E-Mail
Message
After entering the information listed above,
enter an outgoing address, and click "Send Test E-Mail". An e-mail should be sent to this address and
received within a few minutes. Check to
make certain that it is received to verify that you have successfully completed
the setup.
Note: For diagnostic purposes, the file c:\Bgmapwin\VQF\Blat.log
contains a log of the last test e-mail send attempt. The contents of this file are displayed in
the box labeled "Test Log".
Accessing the Topics Data
Entry Window
In the BG-Map menu, click Utilities/VQF
Options. Click the “Topics and Special
Collections” tab, and then click “Edit Topics”. This window allows you to
create or modify Visitors QUICKFinder Topics.
These are informational topics that appear on the VQF home page. Topics can describe events, special exhibits,
classes, history of the garden, or other items of general interest to visitors.
Creating A Topic
Click the "Start" button, and select "Define a new Topic
Code". Enter a code of 16
characters or fewer for the new Topic.
Then, fill in the information as indicated for each prompt.
Title (required)
Enter a title for this Topic.
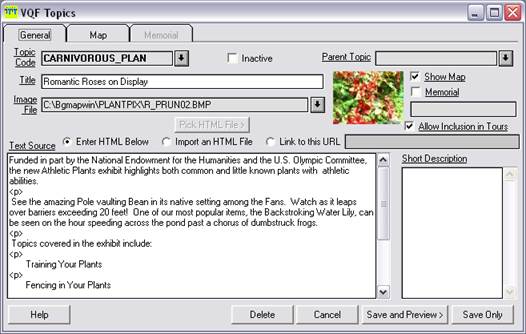
Parent
Topic (optional)
You can specify another Topic to which this
Topic "belongs". In this way,
you can create a hierarchy of topics and subtopics. For example, you could create a Topic called
"Birds at the Arboretum". You
could then create additional Topics for each bird species, and specify
"Birds at the Arboretum" as their parent. With this setup, visitors can select the main
Topic ("Birds...") and then touch the "Details" button to
display a list of all bird species, from which they can select.
To select the parent
topic, click the "Browse" button.
Image
File (required)
Click the "Browse Button" (down
arrow), and select an image file to be displayed on-screen with this
Topic. The selected image will be
displayed to the right of the filename in the same format as it will appear in
VQF.
Note: Image files are typically
.BMP or .JPG files, and should be horizontally oriented. Do not use .GIF files for this purpose.
Display
Mode
Choose "
Note: Memorials cannot be displayed in Browser Mode.
Text
Source
Choose "Enter HTML Below" to enter
HTML code for the Topic description into the box below.
Choose "Import an
HTML file to import an HTML file that you have created by another method. Then, click the "Pick HTML file"
button to choose the file. The HTML code
will be inserted into the box below. You
can still edit it if you wish.
Choose, "Link to this
URL", to link the Topic to a web page on the internet or an intranet. Enter the URL into the space provided.
Note: The Topic display window
now supports all HTML formatting codes, including images and hyperlinks. If you employ hyperlinks, you must be careful
not to employ any links that create additional browser windows or links that
may take the visitor to places you do not wish him to visit. Use links judiciously.
Linking
to Another Topic
You can create a hyperlink within the text
source of a Topic to jump to another topic.
To create the hyperlink, use a standard HTML “href”
tag where "file://c:\bgmapwin\VQF\topic.htm#” plus the Topic Key of the
Topic to jump to is the target. For
example, suppose you wish to jump to a new Topic whose Topic Key is
CARNIV_PLANTS. You could enter these
lines of HTML in your Topic description:
<a
name="CARNIV_PLANTS"></a>
In May, be sure to visit our new <a href=”"file://c:\bgmapwin\VQF\topic.htm#CARNIV_PLANTS”>Carnivorous
Plants Display</a>.
(Note, the additional line
- <a name="CARNIV_PLANTS"></a> - which is needed to make
the link work.)
Show
Map
If you wish to allow the visitor to view a
map showing the location of this Topic, check this box. Then, click the "Map" tab, and
enter the coordinates of this Topic in the form X,Y or click "Pick Coords", and click the Topic's location on the map.
Allow
Inclusion in
Check to permit
this Topic to be included in "Create a Tour" tours selected by the
visitor or in pre-selected "canned tours".
Note: Only mapped Topics can be included in
tours.
Memorials
A Topic can be set up as a
memorial - for a bench, plaque, sculpture, etc.
Memorial Topics must have map coordinates. To allow visitors to search for memorials,
you must enable this feature in "VQF Options".
To designate a Topic as a
memorial, check the "Memorial" box, and then click the
"Memorial" tab to enter the name of the person this item is in memory
of. As a minimum, the last name is
required. The "Last Name"
space can also be used to another sort of name, such as "Graduating Class
of 1997".
You may also enter the
full name of the donor (optional).
Choose either the default
description "In Memory of" or the alternate description "In
Honor of". You may also change the
wording of the alternate description, if desired.
If the donor or honoree is
an alumnus of your institution, check the corresponding box and enter the year
of graduation.

Converting a Facilities
Management Object to a Memorial Topic
You can create a Visitors QUICKFinder (VQF)
memorial topic for this object by clicking “Convert to VQF Topic button in the
“Donor” tab of the Facilities Management Objects data entry window.
Information will be
transferred from the Facilities Management Object to the VQF Topic as follows:
|
Topic Key |
From Object Key (converting asterisks to underscores) |
|
Topic Title |
From Object Description |
|
Topic Description |
From Object Comments |
|
Map Coordinates |
From Object Coordinates (must be mapped) |
|
Donor |
From Donor |
|
In Memory Of/Honor Of |
From In Memory\Honor Of |
Previewing The Topic
Click "Save and Preview". The Topic must be saved before previewing.
Modifying An Existing
Topic
Click "Start", and select an
existing Topic to be modified.
Making A Topic Inactive
Check the "Inactive" box to make a
Topic inactive. If inactive, it will not
appear in pop-up selection lists.
Permanently Deleting A
Topic
Click "Start", and select an
existing Topic. Click
"Delete".
How to Create and Edit
Special Collections
Accessing the Special
Collections Data Entry Window
In the BG-Map menu, click Utilities/VQF
Options. Click the “Topics and Special
Collections” tab, and then click “Edit Special Collections”. This window allows
you to create or modify Visitors QUICKFinder Special Collections. These are
lists of plants from which the visitor can select. Each list can be based on a theme or category
- for example - "Winter Blooming Plants", "Plants With Low Water
Requirements", etc. Each Special
Collection is identified by a code.
Creating A Special
Collection
Click the "Start" button, and
select "Define a new Special Collection Code". Enter a code of 16 characters or fewer for
the new Special Collection. Then, fill
in the information as indicated for each prompt.
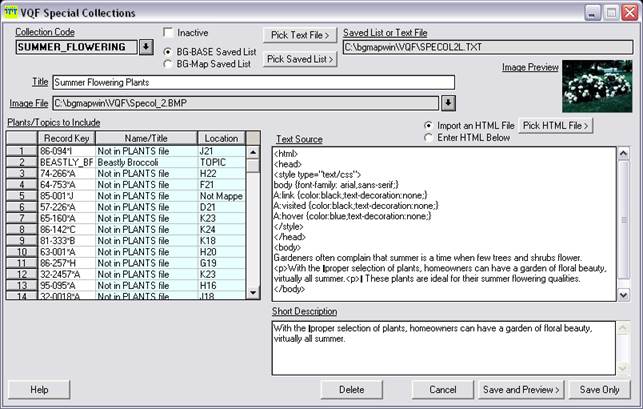
Title (required)
Enter a title for this Special Collection.
Image
File (required)
Click the "Browse Button" (down
arrow), and select an image file to be displayed on-screen with this Special
Collection. The selected image will be
displayed to the right of the filename in the same format as it will appear in
VQF. Note: Image files are typically .BMP or .JPG files,
and should be horizontally oriented. Do
not use .GIF files for this purpose.
Text
Source
Choose "Enter HTML Below" to enter
HTML code for the Special Collection description into the box below.
Choose "Import an
HTML File” to import an HTML file that you have created by another method. Then, click the "Pick HTML file"
button to choose the file. The HTML code
will be inserted into the box below. You
can still edit it if you wish.
Plants/Topics
to Include
You must enter at least 1 plant or topic in a
Special Collection. Plants can be entered in one of 4 ways - typing in an
accession number, browsing for an individual plant, using a BG-BASE
saved list or using a text file. Topics can be entered by typing in a Topic
Code, by browsing or by using a text file.
·
Typing in an Accession
Number or Topic Code - Click on an empty cell
in the "Record Key" column, type in an accession number with
qualifier or a Topic Code, and press . To create a new empty row, click on any
row, then right-click and select "Insert Row Below."
·
Browsing for an Individual
Plant or Topic - Click on an empty cell in the
"Record Key" column, then right-click, and select "Add a
Plant/Topic." Use QUICKFinder to find a plant or select a Topic from the
displayed list.
Note: Only those Topics that were designated for inclusion in tours
will be displayed in the popup. For information on how to designate a Topic for
inclusion in tours, go to Utilities/VQF Setup/Edit Topics and click help.
·
Using a BG-BASE or
BG-Map Saved List (Plants Only) -
Click the "Pick Saved List" button, and select a BG-BASE or
BG-Map saved list. The list must contain at least 1 living plant. The plants
will be inserted into the table, replacing any plants or Topics that are
already listed there. Only valid living plants will be displayed in VQF.
Unmapped plants will be shown only if you have selected "Show Unmapped
Plants" in VQF Options.
·
Using a Text File (Plants
or Topics) - Click the "Pick Text
File" button, and select a saved text file. Normally this kind of file is
created using Windows Notepad, and has a filename extension of .txt The plants
and Topics will be inserted into the table, replacing any plants or Topics that
are already listed there. Only valid living plants and mapped Topics will be
displayed in VQF. Unmapped plants will be shown only if you have selected
"Show Unmapped Plants" in VQF Options. Unmapped Topics are never
shown.
When creating the text file, list each accession number or Topic Code on a
separate line. You may optionally add a comma after the accession number or
Topic Code, followed by the plant name or notes to help identify the plant or
Topic - as in this example:
86-142*C
86-257*H,Mag. virg. near
Rose Garden
48-287*F
ROMANT_ROSE, Romantic Roses display (topic)
83-081*A
VEG_GARDEN
65-160*A,'Annabelle' Hydrangea
Deleting a Plant or Topic
From the List:
Click on a row, right-click and select "Delete Row."
Previewing The Special
Collection
Click "Save and Preview". The
Special Collection must be saved before previewing.
Modifying An Existing
Special Collection
Click "Start", and select an
existing Special Collection to be modified.
Making A Special Collection
Inactive
Check the "Inactive" box to make a Special Collection inactive. If inactive, it will not appear in pop-up
selection lists.
Permanently Deleting A
Special Collection
Click "Start", and select an
existing Special Collection. Click
"Delete".
![]()
![]()