|
|
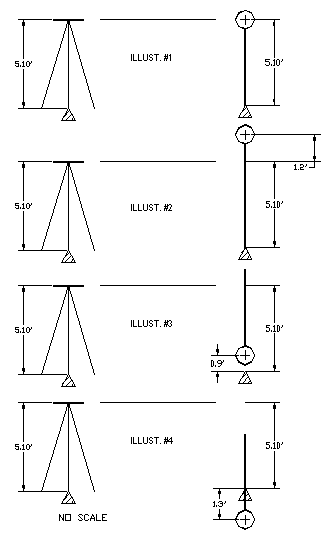
Elevations and Vertical Offsets BG Map allows the user to assign elevations for control points and to carry the datum to located objects, whether they are designated NPO's (Non Plant Objects) or not. The programming assumption for this calculation is that the instrument and rod are the same exact height, i.e. HI = ROD, as in illustration #1. If you work with elevations and the screen prompt asks for the vertical offset in this circumstance, then the correct value is 0.0 or the default <ENTER>. In the real world of surveying, often we need to manipulate the rod height so as to allow more flexibility for sighting objects. Branches and other obstructions frequently dictate creative ways to get a shot from a given setup. Most rods have a sliding sleeve for changing the mirror height. In very difficult circumstances, where vertical accuracy is only needed to the nearest 0.5', I have attached the mirror to the top of a 25' fiberglass rod; however, most everyday work can be done with an 8.5' or 12.0' adjustable prism rod. The burden of keeping track of the vertical offset falls to the rod person. After confirming the HI with the instrument operator, the rod person must keep track of the mirror height, keeping in mind that the goal is always to calculate the offset to return the value to the HI of the setup. Rod heights above are always 'minus' values and heights below are always 'plus' values. The illustration #2 shows a mirror above the HI and the vertical offset is -1.2'. When giving a high rod, try to use an even offset for simplicity. If the HI is 5.10' then try using 6.10', 7.10' or 8.10' heights so that the offset is whole foot (or half foot: 6.60', 7.60') intervals before using an arbitrary height which takes some mental calculation. Illustration #3 shows an often-used trick. Low branches frequently interfere with tree locations, so shooting just below the leaf line at the base of the plant means just inverting the rod, perhaps snug against the trunk. Now you must add a 4.20' vertical offset to bring the rod height back up to the 5.10' HI. Illustration #4 demonstrates the mirror below the target. Though shown as inverted, this arrangement can occur whether the rod is inverted or upright, as when for instance you have a target on a ledge well above your head. In any case you must add 5.10' and 1.30' for a 'plus' 6.40' vertical offset. Take some time to understand this in terms of always returning the mirror to the HI height above the target. Datums In New York City, every one of the five boroughs and every city agency seems to have its own datum. This evidently conveys an austere sense of power and importance to those who need it. Your datum is the source of your elevations and should be specified on your work product, whether derived locally or remotely to your site. It is most important that an entire site has a unified datum so that all the elevations relate directly to each other. That means that an adjusted benchmark run is needed through any control points you intend to use for elevations. It may just as well be an official government benchmark that is used to begin or it may be an assumed elevation that allows you to be consistent in your elevations (as well as to maintain positive number values). If you deal at any time with aerial photography for your site, you will be well served to have consistent and uniform elevations available. |