BG-Map Surveying Tip
Procedure for Collecting Total Station Field Mapping Data
Updated 1/25/00
Rick Lewandowski of Mount Cuba Center for the Study of Piedmont Flora prepared this document. We are posting it here as an example of an in-house protocol for field mapping. Feel free to adapt it for your own use.
Note: Mount Cuba is using a Pentax PCS 215 total station. You should adapt these instructions for your own model of total station
Procedure for Collecting Total Station Field Mapping Data and
Entry into BG-Map Software on Palmtop
Prior to Physical Setup of the Total Station
- Organize all items found on the "Checklist for Field Collecting" and bring all items necessary to the field mapping location.
- Go out into the garden and find the control point that will become the first site for data collection. Be sure you also know the identification number of this control point.
- Visually locate and determine the identification number of the second control point that will allow you to orient the total station properly. The second control point must be visible for proper total station set up.
Note: For reference purposes throughout these instructions, the front of the total station is the side facing the object to be measured and the back of the total station is the side with the LCD display panel.
Tripod Setup
- Begin setting up the yellow and orange tripod by spreading the legs and extending/contracting the legs so that the height of the tripod will be suitable for observation when the total station is placed on top of the tripod. (Note: Remember that the collimator (crude siting device) on top of the total station is used regularly during total station operation and must be low enough for easy use.)
- Remove the orange plastic protective cover from the tripod head by turning the red center screw counter-clockwise on the underside of the tripod head.
- Position the tripod directly over the top of a control point, spreading the legs far enough to insure stability. Make sure, by sighting downward through the center screw on the tripod, that the tripod is centered over the control point. Position the tripod shoes firmly on the ground, keeping in mind the need to remain over the top of the control point and that the tripod should remain relatively level.
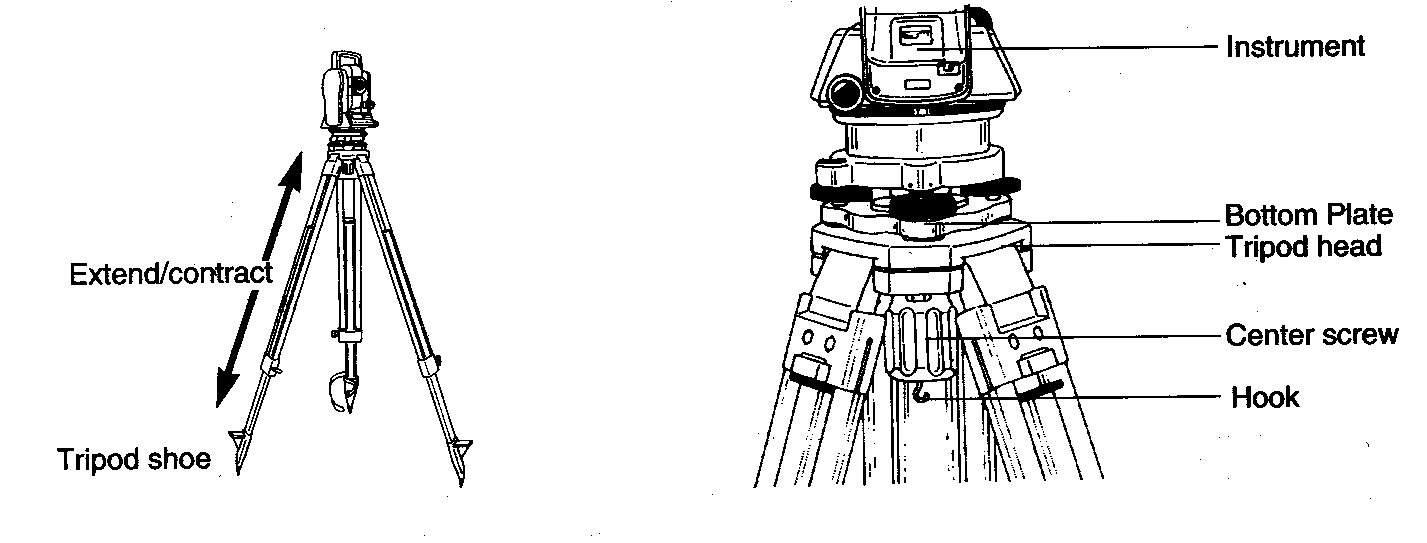
Mounting the Total Station
- With the tripod in place, carefully remove the total station from its carrying case and place it on the tripod head. Attach the total station to the tripod head loosely by turning the red mounting screw clockwise.
- With the total station still loosely attached to the tripod head, look through the eye piece on the black optical plummet two-in-one knob located on the front side of the total station (This eye piece provides a view with a center mark that allows you to center the total station directly over the top of the control point). Rotate the optical plummet eye piece knob (the smaller of the two-in-one knobs) until the center mark can be seen clearly.
- Rotate the focusing knob (the larger of the two-in-one optical plummet eye piece knobs) until the control point on the ground is in focus.
- Now, slide the total station around on top of the tripod while viewing the control point through the eye piece of the optical plummet. Once the total station is centered over the control point (with the center mark over the control point), tighten the red tripod mounting screw so that the total station is firmly attached to the tripod.(At least, have the center mark overlap some part of the control point.)
Note: If you are unable to see the control point through the eye piece, return to step 4 and repeat the tripod set up procedure again.

Leveling the Total Station
- With the tripod and total station now centered over the top of the control point, adjust the tripod legs by extending/contracting them, to position the bubble of the circular vial located on the tribrach of the total station to the center. (DO NOT try to push down on the tripod shoe with your foot to make these adjustments-this may disturb the tripod location.)
- With the tripod now level, release the black clamp screw (the smaller of a two-in-one knob located on the back side of the total station to the right of the square red power supply switch) by turning it counter-clockwise until the total station rotates freely.
- Rotate the total station until the back of the unit is aligned with two of the leveling screws located on the bottom plate of the total station (Let's call this POSITION #1). Re-tighten the clamp screw. Look for the plate vial (or leveling "bubble") located just above the display panel on the back of the total station. The plate vial will be used to make fine adjustments in leveling.
- Begin leveling in POSITION #1 by turning the two leveling screws in opposite directions until the bubble on the plate vial moves to the center of the glass level. With POSITION #1 leveled, loosen the clamp screw and rotate the total station until it aligns with another set of leveling screws (Let's call this POSITION #2). Repeat the leveling procedure by turning the clamp screws in POSITION #2 until the plate vial bubble is once again centered. Loosen the clamp screw and rotate the total station back to POSITION #1 and repeat the leveling procedure. This procedure should be repeated from POSITION #1 to POSITION #2 until both positions remain centered without further adjustments.
- Upon completion of leveling, the "bubble" of the circular vial (located on the tribrach of the total station just above the leveling screws) should still remain in the center. If not, return to step 11 and check the level again.
Powering Up the Total Station
- Turn on the total station by pressing the red power supply switch (the red square button) once on the back of the total station. After the machine beeps, the display panel will display the message: "TURN SCOPE". Loosen the black telescope clamp screw (the smaller of a two-in-one knob located on the back of the total station directly above the power supply switch) by turning the knob counter-clockwise. Pivot the objective lens assembly vertically at least 90o until the "TURN SCOPE" message disappears. Now, re-tighten the telescope clamp screw and remove the lens cover protecting the objective lens.
Powering Up the Palmtop Computer
- With the total station powered up, attach the palmtop computer to the mounting bracket on the tripod and plug the 9-pin female cable into the palmtop. Plug the other end of the cable (round slotted male connector) into the total station (The receptacle is located on the front of the total station just above the optical plummet eye piece).
- Press the "ON" button in the upper right corner of the key pad. When the screen display shows the "Plant Records Mt. Cuba Center for the Study of Piedmont Flora", press the blue "FILER" key (this key contains the symbol of a filing card) in the upper left quadrant of the key pad.
- Press the "PG DN" (Ñ) key in the upper right quadrant of the key pad until "bgmap.bat" is highlighted in black. Press the "ENTER" key. The next screen should be the "BG-Map Total Station Interface".
NOTE: If the screen is too small to read, press and hold the purple "FN" function button while pressing the "ZOOM" key intermittently to determine the most desirable screen size.
Computer/Total Station Alignment Setup
- Enter the Setup mode by pressing the "S" key. The Setup Menu appears. Press the "U" key to select the units of measure and press the "f" (feet) key.
- To begin setting the Station Coordinates, press the "S" key. You will be prompted with: "Coord? (#StationID)". Enter the IDnumber (ie. 2975) of the control point you have selected for your setup location preceded by the # sign; for example #2975 (This is the location where the total station is currently located). Press the "ENTER" key. Coordinates will appear next to the Station X and Station Y labels at the top of the page.
- Next, press the "A" key to begin manually setting the horizontal angle. Enter the Idnumber (ie. 2973) of the control point where the prism is set up preceded by the # sign; for example #2973 (this is the other line-of-sight control point that will tell the total station where it is located). Press the "ENTER" key.
- Write down or note the Azimuth; for example 18o 02' 50". You will use this information in Step #24 as you align the total station with the second control point. DO NOT press the space bar on the palmtop as instructed. Press "Q" to quit (the palmtop returns to the Setup Menu).
- Now, return to the total station and release the black clamp screw (the smaller of a two-in-one knob located on the back side of the total station to the right of the square red power supply switch). Rotate the total station until the display panel reads an angle close to the Azimuth angle you wrote down in Step #23; in this example, 18o 02' 50". Tighten the clamp screw and turn the larger tangent screw knob on the two-in-one knob to make the necessary fine adjustment. Once you have the exact angle showing on the display panel, press the "H.HOLD" button on the back of the total station below the display panel TWICE. The angle has been locked into the total station memory.
- Release the clamp screw so the total station can rotate. (NOTE: the angle will not change as the total station rotates.) Using the collimator (a crude sighting device) on the top of the total station instrument, align the total station with the prism. Utilizing the telescope tangent screw and the tangent screw, center the eyepiece lens vertically and horizontally on the prism with the cross hairs centered on the prism. Focus on the prism using the large focusing knob as necessary.
- Now, with the total station aligned horizontally and vertically with the prism, press the "H.HOLD" button on the back of the total station below the display panel ONCE. This links the azimuth angle (in the example 18o 02' 50") on paper between the two control points, to the instrument in the field.
- YOU ARE NOW READY TO BEGIN MAPPING PLANTS.


Copyright © 2000 Glicksman Associates, Inc. All rights reserved