BG-Map TechNote
Configuring Printers and Plotters for BG-Map
Updated
1/7/16
This document explains how to
configure printers and plotters for printing of book maps and large format maps
in BG-Map
If you
are using AutoCAD - Wait!
Before setting up printers and plotters, make certain that you have copied the
BG-Map Plot Styles, Plotters, and PMP files to the correct
locations. If you reinstall or upgrade
AutoCAD, you will also need these files.
You can download them here. This is not needed if you are using CMS
IntelliCAD.
Configuring a Plotter
(Printer) for Small Book Maps
Note:
This section applies only to BG-Map versions prior to 2016. For BG-Map 2016 and above,
click the “Browse” button to select a printer, and skip to the section “Setting
the Paper Sizes” below.
Follow these instructions to configure
a printer to print Small Book Maps (8-1/2” x 11” or A4).
1. At
the AutoCAD command line, type CONFIG and press <enter>. Choose
the plotting tab, and click "Add or Configure Plotters". A
window will pop up showing your plotter configuration files. (Note: If you are reconfiguring an existing small book map
plotter, delete the file BGM-PR-SM.pc3 before proceeding.)
2. Double
click "Add-A-Plotter Wizard".
3. Click
the "Next>" button. Select "System Printer",
and click "Next>".
4. Select
the printer that you wish to use to print small book maps. This can be any
installed Windows printer that has been set up for paper size 8-1/2" x
11" (or A4).
5. Click
"Next>".
6. Again,
click "Next>" (Do not click "Import File"). For
"Plotter Name", enter the following exactly: BGM-PR-SM
7. Click
"Next>", and then click "Finish".
8. Follow
the instructions under "Setting the Paper Sizes", below.
Configuring a Plotter
(Printer) for Large Book Maps
Note:
This section applies only to BG-Map versions prior to 2016. For BG-Map 2016 and above,
click the “Browse” button to select a printer, and skip to the section “Setting
the Paper Sizes” below.
Follow these instructions to configure
a printer to print Large Book Maps. Complete the instructions in this section
only if you have a printer capable of printing on 11" x 17" (or A3)
paper.
1. At
the AutoCAD command line, type CONFIG and press <enter>. Choose
the plotting tab, and click "Add or Configure Plotters". A
window will pop up showing your plotter configuration files. (Note: If you are reconfiguring an existing large book map
plotter, delete the file BGM-PR-LG.pc3 before proceeding.)
2. Double
click "Add-A-Plotter Wizard".
3. Click
the "Next>" button. Select "System Printer",
and click "Next>".
4. Select
the printer that you wish to use to print large book maps. This can be any
installed Windows printer that has been set up for paper size - 11" x
17" (or A4).
5. Click
"Next>".
6. Again,
click "Next>" (Do not click "Import File"). For
"Plotter Name", enter the following exactly: BGM-PR-LG
7. Click
"Next>", and then click "Finish".
8. Follow
the instructions under "Setting the Paper Sizes", below.
Configuring a Plotter
(Printer) for Large Format Maps
Note:
This section applies only to BG-Map versions prior to 2016. For BG-Map 2016 and above,
click the “Browse” button to select a printer, and skip to the section “Setting
the Paper Sizes” below.
Follow these instructions to configure
a plotter to print Large Format Maps. Complete the instructions in this section
only if you have a large format printer capable of printing on paper of 24” x
36” or greater size.
1. Install
the plotter as a Windows printer using the driver that came with your plotter,
or download a driver for your version of Windows from the plotter manufacturer's
website.
2. At
the AutoCAD command line, type CONFIG and press <enter>. Choose
the plotting tab, and click "Add or Configure Plotters". A
window will pop up showing your plotter configuration files. (Note: If you are reconfiguring an existing large format plotter,
delete the file BGM-PLOT before proceeding.)
3. Double
click "Add-A-Plotter Wizard".
4. Click
the "Next>" button.
5. Select
"System Printer". Then, click "Next>"
6. Select
the plotter from the list of Windows printers. Click "Next>".
7. Again,
click "Next>" (Do not click "Import File").
8. For
"Plotter Name", enter the following exactly: BGM-PLOT
9. Continue
to click "Next>", and then click "Finish".
10. Follow the instructions under "Setting the Paper Sizes", below.
Setting the Paper Sizes
NOTE:
Before starting this step, make certain that CAD is displaying the Command
prompt.
NOTE:
Print options are stored separately for each BG-Map user. You must set paper
sizes separately for each BG-Map user.
In the BG-Map Print menu, select
"Print Options.”
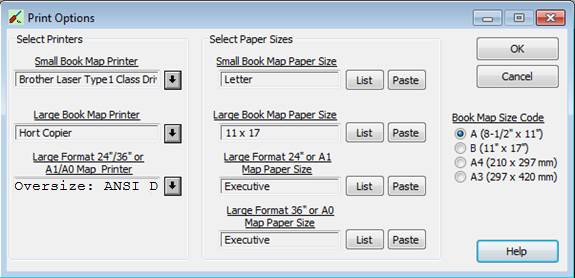
Small Book Map
Printer Make certain that you have completed
“Configuring a Plotter (Printer) for Small Book Maps” above.
1. Click
the top “List” button.
2. AutoCAD
will list the available paper sizes as in the example below:
Available media sizes.
"Oversize: ANSI E "
"Oversize: ANSI D (landscape)"
"Oversize: ANSI C (landscape)"
"ANSI E - 34 x 44 in."
"ANSI D - 22 x 34 in. (landscape)" "ANSI C - 17 x 22 in. (landscape)""Tabloid 11 x 17 in "
"Legal 8 1/2 x 14 in""Letter 8 1/2 x 11 in"
3. Find
the paper size for small book maps - - in the above example: “Letter”
4. Highlight
all of the text on that line, including the quotation marks, right
click, and copy it to the clipboard.
5.
Go back to the Print Options Window,
and click the top “Paste” button.
Large
Book Map Printer Complete this only if you have a
printer capable of printing on 11” x 17” (A3) paper. Make certain that you have completed
“Configuring a Plotter (Printer) for Large Book Maps” above.
1. Click
the second “List” button.
2. AutoCAD
will list the available paper sizes as in the example above:
3. Find
the paper size for large book maps - in above example: “11 x 17”
4. Highlight
all of the text on that line, including the quotation marks, right
click, and copy it to the clipboard.
5.
Go back to the Print Options Window,
and click the second “Paste” button.
Large
Format Printer Complete this only if you have a printer
capable of printing on 24” x 36” (A1) or 36” x 48” (A0) paper. Make certain that you have completed
“Configuring a Plotter (Printer) for Large Format Maps” above.
1. Click
the third “List” button.
2. AutoCAD
will list the available paper sizes as in the example above:
3. Find
the paper size for large format maps - in the above example: "Oversize:
ANSI D (landscape)" (Always choose the “Oversize” option, if
available.)
4. Highlight
all of the text on that line, including the quotation marks, right
click, and copy it to the clipboard.
5.
Go back to the Print Options Window,
and click the third “Paste” button.
![]()
![]()