BG-Map
TechNote
Restoring Programs and Data
to the HP200lx Palmtop
Updated 12/10/02
This document describes how
restore programs and data to the HP 200lx palmtop in the case of complete
battery failure.
Despite
due diligence in battery replacement, you might one day lose both the primary
and backup batteries and have to reload all programs and data back onto the HP
200 lx palmtop. Here's how:
Step 1 - Replace the Batteries
Replace
both the primary and backup batteries - see "Changing
Batteries on the HP 200lx Palmtop Computer".
Step 2 - Set the User Name, Time, and Date
Turn
on the Palmtop. Press the teal-colored <&…> key (more).
Press
the <S> key (setup).
Press
<F2> (time/date)
Use
the Tab key to move between fields. Enter the correct date in the format
mm/dd/yy (example: 02/26/02), and enter in the correct time in the format
HH:MM:SS am/pm (example 04:34:00 pm). Tab until the OK button is highlighted,
and press <Enter>. This will return you to the Setup screen.
Press
<F4> (Owner).
Enter
your name, title, etc. Tab until OK is highlighted, and press <Enter>.
This will return you to the Setup screen.
Press
the <Menu> key, and then <Q> to quit. Repeat. This will return you
to the "Home" Hp200lx screen.
Step 3 - Disable the Calendar Daily Greeting
Press
the teal-colored <Appt> Button (Clock Icon)
Press
the <Menu> key and use the arrow keys to highlight "Daily
Greeting" under "Options". If "Daily Greeting" is
checked, press <Enter> while "Daily Greeting" is highlighted.
Press
the <Menu> key, and then <Q> to quit. This will return you to the
"Home" Hp200lx screen.
Step 4 - Set Communications Options
Press
the teal-colored <Filer> key.
Press
the <Menu> key. Use the arrow keys to highlight "Remote
Settings". Press <Enter>.
The
communications settings will appear. Leave the default settings as-is (19200
baud, Com1, Server Mode Enabled). Press <Enter> to save.
Step 5 - Copy Files
Connect
the cable from the palmtop to the PC. Start Transfile Win 200 on the PC. A
connection to the palmtop should be established.
On
the left side, (The PC side), go to the c:\bgmapwin\totalsta folder (not the
"local" folder - if you are in the "local" folder,
double-click the double dots).
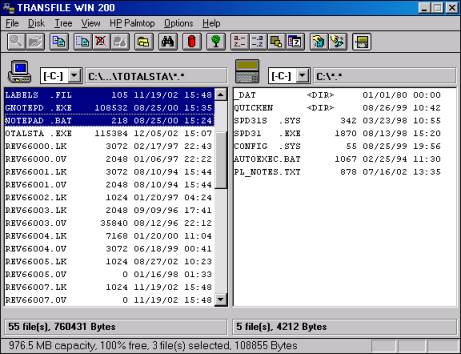
Holding
down the control key on the PC, select the following files on the left side.
(If you don't have all of these files, select as many of these as you do
have.):
|
Totalsta.exe |
(Total Station Interface Program) |
|
Gnotepd.exe
|
(Garden Notepad Stand-Alone Program) |
|
Totalsta.fmd
|
(Total Station/Garden Notepad Field Data file) |
|
Labels.fil
|
(BG-BASE Label Types - for Garden Notepad) |
|
Stations.fil
|
(List of Total Station Control Points) |
|
Notepad.bat
|
(Startup Batch File for Garden Notepad Stand-Alone Program) |
|
Ts-c.bat |
(Startup Batch File for Topcon Total Stations) |
|
Ts-cp.bat
|
(Startup Batch File for Pentax Total Stations) |
|
Ts-cn.bat
|
(Startup Batch File for Nikon Total Stations) |
|
Bg-map.bat
|
(Alternative Startup Batch File) |
|
Bgmap.bat
|
(Alternative Startup Batch File) |
Drag
all of the selected files across to the right side and release the mouse
button.
Wait
until all files have been copied to the palmtop.
Close
Transfile Win 200, and disconnect the palmtop.
(Remember when you later upload field data, you will need to reset
the left side of the Transfile display to the "Local" folder.)
Step 6 - Clear Field Data
Start
the Total Station Interface or Garden Notepad in the usual way.
Select
"Clear Field Data" from the main menu.