BG-Map TechNote
How to
Create or Update a Basemap For
Use With GreVid
Revised
5/9/08
GreVid
version 5.0 and higher is capable of displaying plant location maps. This document describes how to create or
update a basemap for use with GreVid.
BG-Map
can also provide a service to create or update the GreVid basemap
for you. For details, click here..
Step 1 – Create a Bitmap Image of Your Basemap
In
the AutoCAD window of BG-Map, format the map as you wish it to appear in GreVid
by turning layers on or off, attaching xrefs,
erasing, adding etc. Do not turn off the
GRID layer as it will be needed to assist you in georeferencing
the map. Select AutoCAD Plot from
the Plot menu.
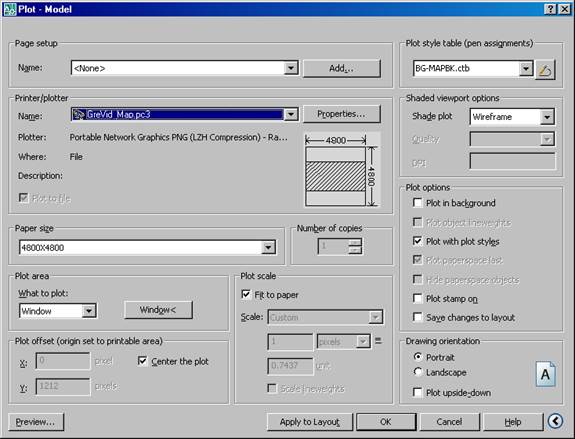
Select
the Printer/plotter GreVid Map.pc3. If this device is not
available, download and install the BG-Map Plotters from here.
Set
the paper size to one of the following values. The higher the number, the more detail will
be shown by GreVid, but more memory will also be used. The setting 4800X4800 works best in
most cases. Chose from one of these:
2400X2400
3600X3600
4800X4800
6000X6000
If
the above paper sizes are not available, download and install the BG-Map PMP
Files from here.
Set
the Plot Style to BGMAPBK.ctb. If this plot style is not available, download
and install the BG-Map Plot Styles from here.
Click
the Window< button, and select the window that encompasses the
area you wish to include on the map displayed by GreVid. Normally, this would include the entire grid
area. However, if there is a part of the
map that you are not currently using to map plants, you may leave it out.
Set
the other settings as shown in the example above, and click OK. This will produce a .PNG image file of your basemap. Save it to
any convenient name and location.
Step 2 – Create a Georeferenced Map
Library Using GPSTools Studio
If
you have not already installed Franson GPS Tools
Studio and the 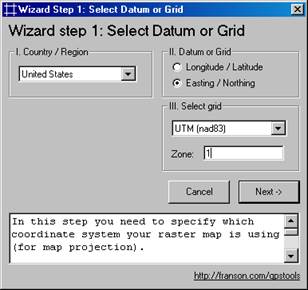 prototype map
library, download them from here.
prototype map
library, download them from here.
Open
the prototype map library, GreVid_Map.MapLib,
using GPSTools Studio. You can access Franson
GPSTools Studio from the Windows Start Menu under
Programs.
In
the Map menu, choose Delete Map, and delete the map GreVid_Map when prompted.
In
the Map menu, choose New Map, and select the .PNG file that you
created in AutoCAD in Step 1 above. The New
Map Settings window will appear.
Simply click OK without changing anything. The map will be loaded and the Scaling
Wizard Step 1 will appear.
Set
the options as shown here regardless of where you are located or what units or
datum your map is based on.
Country/Region:
United States
Datum or Grid: Easting/Northing
Select Grid: UTM (nad83)
Zone: 1
Click
Next, and to go to Wizard Step 2 and
select either Cartesian or Linear, whichever is listed. Click Next to go to Wizard Step 3.
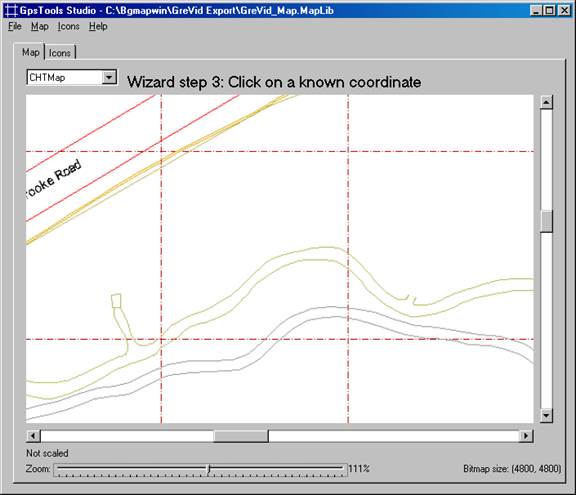
 Use the scroll bars
and the zoom control slider to go to a known point on the map (normally
a grid line intersection.) Click
exactly on that point. This will take
you to Wizard Step 4.
Use the scroll bars
and the zoom control slider to go to a known point on the map (normally
a grid line intersection.) Click
exactly on that point. This will take
you to Wizard Step 4.
Enter
the known coordinates of the point that you clicked (Easting=X and
Northing=Y). Leave the units set to
meters regardless of which units your map is in. Click Next. This will take you to Wizard
Step 5.
Complete
Wizard Steps 5 – 8 in the same way that you completed Wizard
Steps 4 and 5. Make sure to choose three
different reference points that are widely separated and near the
edges of your map.
The
message Scaling Completed should appear.
Click OK. You may click on
various points on the map to check the accuracy of the map scaling. The coordinates that are displayed should
match the coordinates of the points clicked.
If the points are not reasonably accurate, you may run the scaling
wizard again from the map menu.
In
the File menu, click Save MapLib, and
close GPS Tools Studio.
Step 3 – Copy the Map Library to Your Mobile Device
Make
sure that GreVid is not running on the Mobile Device. Connect your mobile device using
ActiveSync. Using
Windows Explorer copy the file GreVid_Map.MapLib
that you just updated with GPSTools Studio to the \Program
Files\GreVid folder on the mobile device.
The
updated basemap will now be displayed by GreVid.
![]()
![]()