BG-Map TechNote
Adding
an Additional BG-Map Workstation
Updated 4/18/2025
This
document explains how to add an additional BG-Map workstation.
If
you have a networked BG-Map installation sufficient OpenInsight user licenses,
you can add a BG-Map workstation.
S Step1 -
Install AutoCAD or CMS IntelliCAD
Install it in on your new workstation.
Step 2 - Copy BG-Map
Copy
the BG-Map folder (c:\bgmapwin) and all included sub-folders from the C: drive
of an existing workstation to the C: drive of the new workstation.
Step 3 - Copy the Startup Shortcut
Copy
the shortcut that starts BG-Map from the desktop off an existing workstation to
the desktop of your new workstation.
Step 4 - Run the User Setup Program
If
the location of BG-BASE or BG-Map (the server location for a network
installation) has changed on your new workstation, run the BG-Map User Setup
Program. Follow these instructions.
Step 5 - Configure AutoCAD (CMS IntelliCAD requires no special
configuration.)
Start
BG-Map on the new computer. In the AutoCAD window, enter the command CONFIG.
If
the background color of the AutoCAD map display is not the color that you want,
click the "Display" tab, and click "Colors". "Window
Element" should read "Model Tab Background". Click the
"Color" dropdown list, and select a background color.
Click
the “Display” tab. Make sure the “Use
Large Icons for Toolbars” is not checked.
Note: In order to make
this color setting “stick”, you may also have to repeat it after starting
“regular” AutoCAD (without BG-Map.)
Click
the "User Preferences" tab.
"Double
Click Editing" (or "Windows Standard Accelerator Keys") should
be checked.
"Shortcut Menus in Drawing Area" should be checked.
“Right-click Customization” options should be set like this:
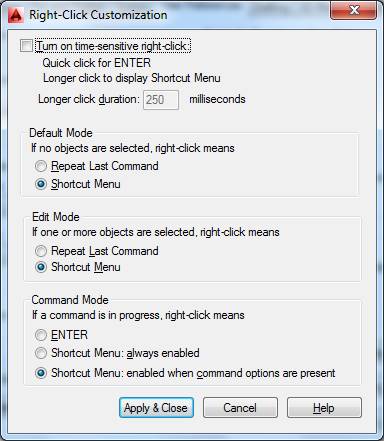
Click
the "Drafting" tab. All of the checkboxes should be checked.
"Alignment Point Acquisition" should be set to "Automatic".
Click
the “Selection” tab. Under “Selection
Preview”, check “When a command is active”, but do not check “When no command
is active.”
Copy
the BG-Map Plot Style, PMP, and Plotter files to the correct locations in
AutoCAD. For details, click here.
Step 6 - Configure Printers and Plotters
Configure
the printers and plotters for printing book maps and large format maps. Follow these instructions.

